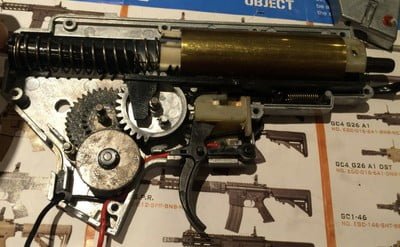
When entering this sport, you’ve probably heard about this regarding upgrades, downgrades or any type of modification. If you’ve ever wondered how your gun works or seek the knowledge on how you could improve your gun, this article will inform you and hopefully encourage you to try out teching. Do be warned that disassembling your gun will almost always void your warranty and should only be done by those knowledgeable in the subject. If you are too scared or paranoid, many airsoft stores and online sites provide services that utilize an expert to manage your weapon. That being said, here is the guide to an airsoft gearbox.
Related Articles:
- Charge it Up! Guide to Airsoft Lipo Batteries [Information]
- Fix it? Airsoft Tech Know Your Equipment [Yes We Can]
What Is An Airsoft Gearbox?
An airsoft gearbox is what’s used to shoot your BB out of your gun. It relies on many essential parts and each part has a lot of significance. There are also different versions of gearboxes where some are more compact and some are more flexible. The types of version vary and are used by manufacturers so that they can provide the weapons that the consumer wants! For example, it would be hard to put a full-sized gearbox in a P90 or a compact SMG. Therefore, it is up to the manufacturer to find a way to please the consumers’ interest. Here is a list that shows what gearbox matches with what type of gun.
 Version 1: FAMAS(F2) *fun fact, the first gun in airsoft was a famas and only the famas uses this!
- Version 2: M4 variants, MP5’s, SIGS, 416s, M249
- Version 3: AK variants, G36, AUG, UMP
- Version 4: PSG-1 * the psg-1 is the only gun that has this version gearbox
- Version 5: Tokyo Marui UZI * the T M UZI is also the only gun that has this version gearbox
- Version 6: P90, Thompsons
- Version 7: M14 variants
To simplify things for the reader, I will focus on the Version 2 gearbox, which I believe is the best learning platform for beginners. You do not have to worry if your gun uses a different gearbox version either because all of these gearboxes operate extremely similar to one another. To start things off, here is a great video that animates the movement and operation of the Version 2 gearbox. Watch this before proceeding so you can get a good picture of how everything connects and moves. Watch THIS YouTube video for more – It’s only 17 seconds!
How to Open the Version 2 Airsoft Gearbox
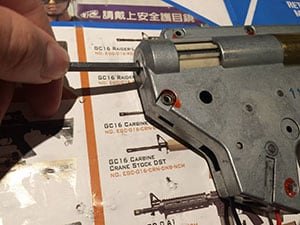 To start off disassembling your airsoft gearbox. You have to know how to get to your gearbox first. Start off by searching the name of your gun accompanied by the word disassembly. Once you’ve reached the gearbox, you can begin the process of opening your gearbox. Get a long screwdriver before you start unscrewing the screws. You’ll want to stick it in the top left hole on the side where the spring is. This will make sure that the spring doesn’t pop out and launch every piece in your gearbox out. This is very important because the gearbox contains many small parts and springs that can be hard to find. Also, another thing to note is that when you are unscrewing your screws, make sure you keep them in a secure place and try your best to prevent stripping them. Stripped screws is a techer’s worst enemy when it comes to disassembling an airsoft gun.
When unscrewing your last screw, place your long screwdriver in the hole indicated by the picture and make sure you have a hand on top of the gearbox. As said previously above, this will make sure your gearbox does not pop out. Next, slowly pry the gearbox shell out by applying pressure downward on the screwdriver. The gearbox should slowly open and you’ll be able to feel more of the springs tension. To remove the spring, simply place a firm hand on your cylinder and apply pressure on the screwdriver. Slowly lift the spring without relieving the pressure on the screwdriver and the spring should come out smoothly.
Airsoft Gearbox Parts In Depth
Gearbox
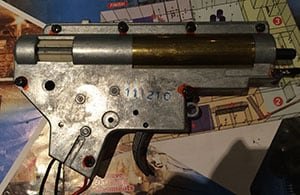 This is the metal/plastic (usually metal) shell that holds all of your internals excluding hop up and inner barrel. A good analogy is to think of the gearbox like human skin. It contains and protects all the vital parts in your system. For a gearbox, there are usually two parts to this shell and it is held together by screws.
Gears
When opening your gearbox, you’ll come across three gears. The Bevel Gear, Spur Gear, and the Sector Gear. The Bevel Gear is the first gear and is at the very bottom of your gearbox. It is usually moved by the motor which ultimately turns all the gears. The Spur Gear is the gear located in the middle of the two gears. Its purpose is to transfer energy from the bevel to the sector gear. The Sector Gear is the last gear and is the farthest right gear. This gear is what connects with the piston which ultimately completes the entire process of shooting a BB. There is also a little nub on the sector gear whose purpose is to engage the tappet plate and pull it back during the cycle. This allows the tappet plate to move forward for another shot.
Gears have ratio types and can be upgraded to a certain build. These builds can be complemented with high-speed gears or high torque gears. If you are a beginner learning to disassemble your gun, try not to worry about ratios and torque. I recommend you concentrate all your brainpower on how to shim a gearbox instead.
Anti-Reversal Latch
This name does exactly what it says it does. It sits right on the left of the Bevel Gear and its sole purpose is to stop the gear from reversing. This piece of metal is quite annoying because it is known to pop out when trying to close your gearbox. If your Anti-Reversal Latch falls out, you’ll just have to be as steady as possible. A good tip that a lot of techers use is to place a magnet at the bottom of the gearbox so that it’ll stay standing up.
Motor
The motor is what allows the gun to fire. It uses juice from your battery to spin, which causes the bevel, spur and sector gear to move. Once these gears move, the piston moves back and your BB should shoot out. The end of the motor is called a pinion gear. It comes in contact with the bevel gear and can be adjusted by your motor adjustment plate for optimal spacing. There are two types of motors that you can choose to upgrade from. High speed and High torque models. High-speed motors are high speed, which means that they’ll be able to cycle your gearbox faster resulting in a better rate of fire. If you have a powerful spring, a high torque motor is suggested because they are designed to pull strong springs. This will result in less of a delay in your trigger response.
Spring and Spring Guide
These parts go hand in hand so I am going to include them together. The spring guide has two prongs which lock in on the top left side of the gearbox. It helps guide the spring to the end of the piston when the 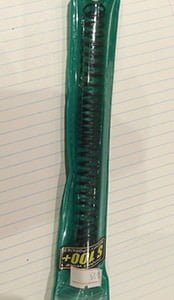 gearbox cycles. This stops the spring from bending and moving in unwanted directions. To upgrade this part, simply purchase any aftermarket spring guide that is made out of durable material. I personally recommend a metal spring guide as they are less prone to cracking.
The Spring is what controls how powerful your gun is. The spring is located on the upper portion of your gearbox and half of it is inside the piston. Springs control FPS which you might have to adjust according to your local field. A Lot of springs are rated in terms of meters per second. For example, an M90 spring is a weak spring and should net you around 300 fps. An M130, on the other hand, could net you 440 FPS. Keep in mind that you should not swap springs needlessly for more power. Sometimes your gearbox parts have to be upgraded with your spring in order to handle the increased stress and tension that the new spring gives. Also, It is important to note that the Spring is not the sole factor in determining FPS. There are many other variables that can increase the velocity in your gun. One of them being good air compression, hopup, barrel, etc. The Spring, however, is still a good indicator of what your FPS range would actually be.
Cylinder and Cylinder Head
The Cylinder is a tube that helps concentrate the air compression unit in one place. It makes sure that no air escapes from the sides and contains other important components used to compress that air. The compressed air is what shoots your BB and having a good Cylinder will increase your accuracy. Some Cylinders have holes and the purpose of that hole is to maximize efficiency. Sometimes the piston only needs to move halfway to compress the air needed so by adding the hole, your compression unit will be more efficient and give you better velocity.
The end of the Cylinder is sealed by the cylinder head. It is connected to the Cylinder and the air nozzle is connected to it as well. All the air gets compressed and eventually exits out the air nozzle. The purpose of the Cylinder Head is similar to the Cylinder as it helps guide the compressed air to where it has to go.
Piston and Piston Head
The piston head is the part that compresses the air in your cylinder. It gets pushed forward and the holes in the piston allow air to come through them which expands the rubber O-Rings. This makes it so that the air can’t escape and the compressed air gets to its destination. Piston heads are made out of many materials and it is generally agreed that a polycarbonate piston head is a great upgrade to start off with. A metal piston head is heavier, increases stress on the gearbox which opens the possibility of cracking the shell. Polycarbonate piston heads are softer so they absorb impacts better which means less stress for your gearbox. They are also quieter which is why most players opt for this material.
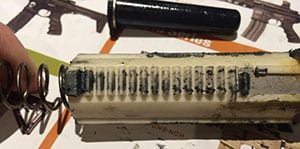 The Piston is also a tube but with little teeth along the bottom middle side. These teeth are what the sector gear connects with and is used to cycle the spring of your gearbox. The rails on the top and bottom help guide the piston during movement. When putting your gearbox back together, be sure to align the rails correctly as that is a common mistake. To upgrade this component, you have two materials that you can opt for, metal and polycarbonate. The benefits are the same as the Piston Head where there would be added stress for the metal piston but the velocity would be increased. The polycarbonate Piston Head would put less stress on your gearbox and less wear on your gears as well.
Tappet Plate
The tappet plate is connected to your nozzle and spends most of its time on top of the sector gear. As said above, there is a little nub on the sector gear that retracts the tappet plate during the revolution. Once the motion is completed, the tappet plate actually slides off the nub which will push the air nozzle a tiny bit. This movement loads the next BB which is your next shot. These things are not usually upgraded and easily replaceable if broken.
Bushings
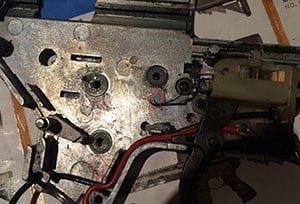 Bushings are the circles that spin in your gearbox shell. When closing your gearbox, you’ll notice that the gears align with the bushings because its main purpose is to help spin the gears. Without bushings, your gears would not be able to spin smoothly and you would have a dead gun. That being said, bushings come in many different sizes depending on your gearbox but they generally serve the same purpose. They reduce wobble in your gears and makes sure your gears are spaced appropriately. There are actually two types of bushings. Bushings which help high FPS builds due to being more durable and Bearings which help ROF builds due to reducing friction. Bearings are weaker than bushings which means that they will break more easily. If you have a high FPS spring and your gun is focused on power, you might want to avoid bearings as it can cause problems for your entire gearbox.
Shims
You might have noticed extremely small washers that sit on top of your gears and bushings. These are called shims. The purpose of a shim is to space the gears from the gearbox so that they can spin freely. When adding or removing shims, try to find the perfect balance of having too little shims could make your gear’s wobble. If your shims are too tight, your gears might not move at all! Having a good shimming job is probably one of the most significant upgrades an airsoft player could have for his gun.
Trigger
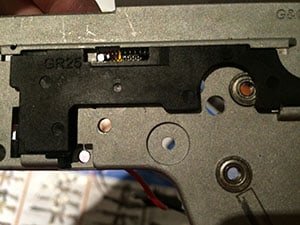
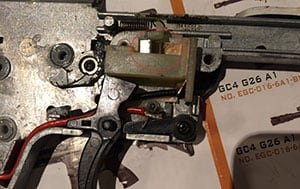 The way your trigger works is when you pull the trigger, a thin piece of metal moves forward and touches another piece of metal. This completes the circuit and the electricity from your battery will flow through your wires. If you are in the full-automatic mode, then the current won’t be cut off by the cut off lever. If you are in the semi-automatic mode, the current will be stopped by the cut off lever which will interrupt the circuit.
Selector Plate
This selector plate’s purpose is to choose firing modes that your gun offers. It is located on the back of your gearbox and works with your gun body to change modes. For example, moving it all the way to the right engages full-automatic mode on an M4. Moving it in the middle is semi-automatic and all the way to the left would enable safe mode. This piece is important because if enabled to semi-automatic mode, this piece will engage the cut off lever making it active.
FAQ
What airsoft gearbox should I get?
Whichever gearbox you decide on would not really matter as all gearboxes are extremely similar to one another. The different versions are just so that they can fit in another gun body. For example, a version 6 gearbox is more compact which makes an AEG P90 possible in the market.
 What grease for airsoft gearbox?
There are lots of types of grease and lubricants that can be great for your gearbox. First things first, make sure your lubricant/grease does not contain any petroleum inside of them. Using a petroleum-based product has the potential to destroy or change any important plastics/rubbers that you have like your hop up.
How do you clean airsoft gearbox?
To begin the procedure of cleaning an airsoft gearbox, firstly remove all parts from it so that you are left with the shell only. What I like to do once I have my two shells is scrub down all the excess grease using soap. Then submerge the gearbox shell in hot water so that the soap comes off the shell. When the gearbox is ready, wipe it down and make sure it is completely dry. Once all these steps are completed, you can start relubricating and placing your parts back into the gearbox.
How do you reduce airsoft gearbox noise?
What you are hearing that is making noise is usually the piston head moving back and forth as well as the whirr that you hear from the motor. To reduce the noise, shim your gearbox as best you can and switch your piston to polycarbonate material. Also, get a high torque motor and even sound insulation foam pads could help. Lastly, I recommend you adjust your motor height perfectly using the motor adjustment disc at the bottom. This is important because you want your motor(pinion gear) to align with your bevel gear as best as you can so the process of moving is smooth.
Guide to Airsoft Gearbox Final Thoughts
Knowing what or how to tinker with your gearbox is an invaluable skill every airsofter should know. It might seem overwhelming at first when knowing what each and every part of your gearbox does but with time, it’ll come to you. Opening and understanding your gearbox is one of the things that if you do it once, it’ll get easier with every consecutive time. Thank you for reading this guide. Thank you for visiting iamairsoft.com! For great products and more information about the game, check out our Airsoft Buyers Guides and Airsoft U!

Henry grew up in Toronto, Canada where he did the basic stuff children do. He has a passion in Airsoft and loves to introduce others to the sport. He currently studies at York University and plays mostly at Siege Airsoft.

